
Let’s say you have a 3d game and would like to show the player’s progress in a more volumetric way, like inside the game but not from UI. While the player does their action, your progress bar could stay next to them enabling checking their progress in a more immersive way.

As a game developer, I have a tendency to obsess about one topic and keep experimenting. Very recently I made a tutorial video on sprite-based progress bars I use in my games and wondered what more kinds of progress bars could be made.

I had recreated “What goes behind the progress bars” gif in Unity and thought this time a more linear progress bar should work (Non-linear one had a different progress bar creation approach in Shader Graph using tiling and textures. Tweet has a little bit more information. Probably, I will write a tutorial on it too). After looking at the graph I decided to simple it down and also create a more reusable progress bar shader so the user can change colors through the editor without any need to create a new texture from another software.
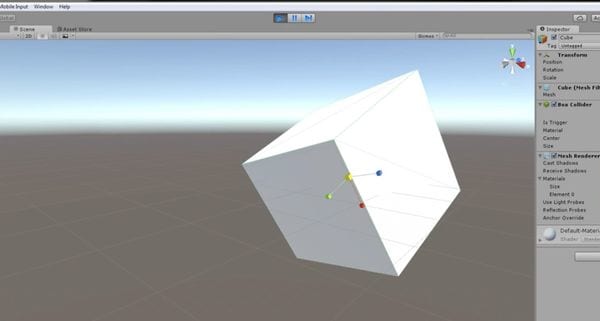
In this post, I will be using a Shader Graph to create the said effect on a scaled Unity cube, but with value tweaking, other game objects could turn into progress bars as well.
Disclaimer, I am no expert at Shader Graph but I like to play with it and try to create what was on my mind. I value good quality development and try my best to take approaches that with my skill set. For this tutorial, I tried my best to explain the parts as I understood and try to convey a simple view from a Shader Graph beginner with said mindset. I have another project with Shader Graph in this blog created with a similar approach, It is about creating moving stripes and manipulating their speed with the mouse position.
My go-to tutorial and starting point on creating this is on Codin Black [ link]. I suggest you check it out, the nodes and concepts are very well explained there. Plus, It really is a fun shader to play around and experiment.
Shader Graph
This project is implemented with Unity version 2019.3.0f6, and Shader Graph package version 7.1.8, the project created with URP template.

This shader graph has 3 properties, FillColor, EmptyColor, and FillRate. FillColor is the color of fill, EmptyColor is the empty state color of the progress bar. Well, those variable names felt very self-explanatory. FillRate is a value between -0.51 and 0.51 making total value represented on progress bar 1.02. 0.01s are for preventing clippings on the sides.
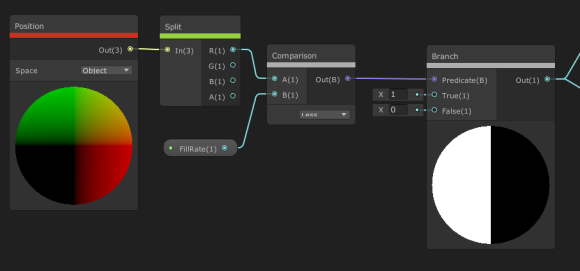
For Position node, Unity docs say “Provides access to the mesh vertex or fragment’s Position, depending on the effective Shader Stage of the graph section the Node is part of.” This returns the coordinate system for the material on the selected Space. Object space felt to me like how Transform.TransforPoint works. The local coordinate system of the material.
Split node takes a vector input and outputs its parts from first to last. In our case, we give a coordinate system and R output gives us, X coordinate. This implementation is on X coordinate, but you can take G output and have your progress bar work on Y coordinate.
Comparison node compares the values of its inputs and creates a new output by the comparison of these values specified on the comparison approach. in our case, if A < B the places will be labeled true, otherwise they will be labeled false. FillRate is compared with all the coordinates in the coordinate system. If FillRate is 0.2, the material will be filled %70 with FillColor. If FillRate is -0.2, the material will be filled %30 with FillColor. coordinates less than -0.2 will be set as true.
Before doing this, I had difficulty understanding what Branch node exactly does. Now I can say I grasped its general action. What is given in Predicate input works like a boolean map. Where the value is true it puts the value in True input, where the value is false it puts the value in False input. This is where we translate values into a color space. Where FillRate is greater than the point in coordinate space, it is white (1), the other side is black (0).

For Replace Color node, In input (0,0,0 (black color)) tells which color to replace the color in To input. If there is no match for the color in In, the places colored black. Where is black, its color is replaced with EmptyColor, If there is a color other than black, it is colored black.
Multiply node multiplies A and B inputs in place. White (1) * FillColor = FillColor, Black (0) * FillColor = Black (0).
In the end, we have two nodes consisting of one side color and the opposite side is black. using Add node we can add colors with Black(0) and get the color replaced with the black sides.

Connecting the output of the last node to the Albedo input of our Master node is the last action. Now by changing the FillRate on the shader we can fill and empty the progress bar.
Demo

The value of FillRate can be changed through code as well. In this demo ChangeValue function is added to buttons’ OnClick events. When they are clicked corresponding increase or decrease action is taken on the progress bar.
using UnityEngine;

public class ShaderGraphProgressBar : MonoBehaviour
{
float _FillRateValue = -0.51f; //progress bar starts empty
Material objectMaterial;

float stepSize = 0.1f; //progress is done by this value

// Start is called before the first frame update
void Start()
{
objectMaterial = new Material(Shader.Find("Shader Graphs/ProgressBarSingleAxis")); //creating a material with the shader
gameObject.GetComponent<Renderer>().material = objectMaterial; //new material is applied to the game object
objectMaterial.SetFloat("_FillRate", _FillRateValue); //initial value is set
}


public void ChangeValue(bool increase) //enables changing the value of progress bar
{ //if increase param is true, the progress bar progresses otherwise it deprogresses
if (increase)
{
_FillRateValue += stepSize; //progress increased
}
else
{
_FillRateValue -= stepSize; //progress decreased
}
objectMaterial.SetFloat("_FillRate", _FillRateValue); //Update the value of the progress bar
}
}
Future Steps

This shader graph enables one axis at a time and prompts the developer to change the fill axis through the Shader Graph Split node. This lead me to experiment a little bit more and I created a somewhat axis flexible shader graph, that works for all 3 axes without the need to change the shader. After working a little bit on it I may write about it too.
If there is a need for a 3d progress bar for your games you can use this shader and change the FillRate through scripts. There are lots of places for experimenting with this shader. At the moment I am considering adding textures to fills and the background.
Hope this will be helpful in your game development journey. If you would like to see more written tutorials on Unity you can follow this blog. Also, I share updates on Twitter as well.

Comments are closed.